First of all, the focus of this tutorial is to show you how to create a unique looking pictureframe. I chose to turn it in to a wallpaper because I'm sure a lot of people won't know what I'm talking about when I say 'Create a sleek looking pictureframe for your Deviant ID'.
Examples of what you can use this tutorial for are avatars, (yup) a Deviant ID or cd-covers to go with your iTunes or Windows Media Player.
Be creative!
You'll need Photoshop CS2 for this Tutorial
- open a new file of 1024x768px and fill it with black
- create a new layer (name it "picframe"), select your Elliptical Marquee Tool and create a square with a fixed size of 250x250px
- Fill this square with black, go to 'Layer' > 'Layer Style' and change the following settings:
- Open up the picture you want to place inside the picframe and resize it to 240x240px
- name this layer 'photo' and center it inside the picframe layer. When you've done this hold down Ctrl and click on the 'picframe' layer and the 'photo' layer in the Layer window
- Right-click and select 'Merge layers'
- Create a new layer (name='top glass') and make a square of 238x238px with the 'Rectangular Marquee Tool'
- Center it inside your photo
- Select the 'Eliptical Marquee Tool' and while holding down 'Shift' draw out a selection as shown in the screenshot:
This leaves you with the following result:
- Fill this selection with white and set the Opacity of the layer to 30%
- Create an new layer (name='bottom light") again and draw out a rectangle (Rectangular Marquee Tool) with a fixed size of 238x120px
- Get your 'Gradient Tool' out with a 'white to transparant' gradient and draw out a straight line from the bottom of the selection to the top of the selection.
- Set the opacity of this layer to 20%
- This is what it should look like by now (zoomed in on picframe):
- Hold Ctrl down and click on the 'bottom light', 'top glass' and 'photo' layer in your layers window
- Right-click and select' Merge Layers'
- Right click on this new merged layer and select 'Duplicate Layer' (or drag the layer to the 'new layer' icon at the bottom of your Layer window)
- With this copied layer active, go to 'Edit' > 'Transform' and give it a vertical Flip
- Select your 'Move Tool' and drag the layer down to just underneath the original layer, leaving just a thin space between the two pictures (see screenshot):
- Create a new layer, take out your pencil tool with a size of 2px and #585858 as the color and draw out a straight horizontal line over the full length of the file
- Drag this 'line' layer just above the original 'background' layer so that it's behind the two other photo layers (see screenshot)
- Select the 'Magic Wand' and click underneath the line
- Create (yup - you guessed it!) another layer (name='white gradient') and, with the selection still active, apply a gradient ('white to transparant') from the top of the selection to the bottom of it
- Set the opacity to 40% on this layer
- Keep the selection active, create a new layer (name='black gradient') move it all the way to the top of the layers and apply a black gradient from the bottom of the selection to the top of it
- You probably have to repeat this gradient 5 to 6 times to get the right result
- This is what you should have by now:
- Guess what...you have to create a new layer (name='backlight')
- Select a 'Soft Mechanical Brush' with a size of 500px and white as the foreground color
- Click once with your brush on the 'backlight' layer giving you a nice white glow.
- Place this layer right above the 'white gradient' and 'line' layer, centered behind your original photo layer (the non-mirrored one)
- Go to 'Filter' > 'Blur' and apply a Gaussian Blur of 50pixels
- Next (and this is optional) duplicate your background layer, go to Filter > Render > Lighting Effects and channge the following settings:
(it even might look better if you apply the same lighting effect twice - experiment with it a bit)
After applying some text, mirrored the same way as I did with the pictureframe, this is the final result:
Click here for the Full-Size wallpaper.
Sunday, April 29, 2007
Wallpaper with a sleek mirrored pictureframe
Posted by
THC
at
1:10 PM
3
comments
![]()
Labels: photoshop
VirtualDub Mod Icon

Yet another fine piece of software that has an outdated icon, so I did my best on creating a custom one.
You can donload it here.
Posted by
THC
at
2:23 AM
0
comments
![]()
Labels: icons
Saturday, April 21, 2007
SnapShots now available through KlipFolio
I'm proud to announce that it is now possible to stay up-to-date on SnapShots through Klipfolio.
For those of you that don't know what klipfolio is: Have a look at their mainpage.
Already got KlipFolio?
click on the image below to add the SnapShots klip:
Or you can click on the Klip icon at the top of the sidebar.
Posted by
THC
at
11:16 AM
0
comments
![]()
RSS icons
Posted by
THC
at
4:31 AM
0
comments
![]()
Labels: icons
Sunday, April 15, 2007
Create a Speechbubble in illustrator
- Open a new file (any size you want), select the Ellipse Tool and draw out an ellipse with White as the Fill color and No color for the stroke
- Get the Pen Tool out and draw a triangle (Fill: white - Stroke: None) as shown below (make sure that it's proportional to the ellipse you just created)
- Go to Object > Transform > Rotate and rotate it with -20%
- Move the triangle you just created in to the Ellips as shown below:
- Go to 'Window' and check 'Pathfinder'
- Make sure you have both the ellipse and the triangle selected and click the 'Add to Shape Area' icon in the Pathfinder window
Both are now merged together
- Go to Effect > Stylize > Inner glow and change the following settings:
The color used is #CBECF4
This is what you should have so far:
- Select the Ellipse Tool again and draw out an ellipse (Fill: White - Stroke: None) as shown in the screenshot
- Next, go to Effect > Warp and give the newly created ellipse an 'Arc' warp with a bend of 15%
- Move it down a little bit so that it fits back in to the speechbubble
- Make sure the warped ellipse is still selected and give it an opacity of 50%
Now the final touch...
- Select the Speechbubble and change the stroke to #B7DCE2
All Done!
Posted by
THC
at
3:55 AM
2
comments
![]()
Labels: illustrator
Saturday, April 14, 2007
MediaPlayer Icon
The idea was to make an icon that could fit any mediaplayer.
I guess I managed that - but you can use it for whatever you like really.
Sizes:
------
16x16 to 256x256
Download
Posted by
THC
at
5:57 PM
0
comments
![]()
Labels: icons
Create an eightball in CS2
- Open up a new file of 512x512px (it's always better to start of bigger than the size you're actually going for)
- Select the Ellips Tool and create a circle with a fixed size of 300x300px (make sure your foreground color is set to black)
- Click once in your file and you'll see the black circle appear. Now center it with the move tool.
- Go to your layer window and right-click on the shape layer. Select 'Rasterize Layer'
- Select the Ellips Tool again and create a circle with a fixed size of 165x165px. Make sure your foreground is set to white and click once in your file
- Rasterize thez layer as you did with the big black circle and possition it as shown below:
- Create a new layer and name it 'top-light'
- With the Elliptical Marquee Tool draw out a circle as shown in the next screenshot:
- Select the Gradient Tool with a 'White to Transparent' style and draw a straight line from the top of the ellips to the bottom of it.
- This is what it should look like by:
- Create a new layer and name it 'bottom-light'
- With the Elliptical Marquee Tool, draw out a circle as shown in the screenshot:
- Select the black circle layer and click with the Magic Wand,while holding down Alt, on the white background inside the selection
- Go back to the 'bottom-light' layer (make sure your foreground color is set to white) and Select the Gradient Tool with a 'White to Transparent' style and draw a straight line from the bottom of the selection to the top of it.
- Go to Filter > Blur and select a Gaussian Blur of 26pixels
- This is what it should look like:
-Select the Text tool with a Georgia Font of 160pt and black as the Foreground Color.
- Press '8' on your keyboard and center the number inside the white circle.
- Also move the layer right underneath the 'top-light' layer.
- With the '8'layer still selected, go to Edit > Transform > Warp > and apply an 'Inflate' warp with a bend of 25%
- Next, select the Text tool with the 'Chiller' font (size: 160pt) and #f9b30b as the foreground color
- Type in 'eightball' (or whatever you want to type)
- Go to Layer > Layer Style and change the following settings:
Color used for the gradient is #ff0000
- After placing the text to an appropriate place, cropping and resizing, this is what the final result should look like:
Posted by
THC
at
6:08 AM
0
comments
![]()
Labels: photoshop
Monday, April 09, 2007
Create a shiny shield logo
This tutorial will show you how to create a nice looking Shield logo with the use of default shapes in Photoshop CS2.
- Open a new file of 512x512px (it's always better to start off big in case you want to resize the logo)
- Name it 'Base shield'
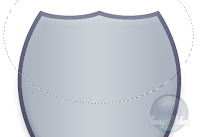
- Select the custom shape tool and create the custom shape you see below with a fixed size of 400x450px, and fill it with #5e617c
- Next, right click on your layer in the layer window and select 'Rasterize layer'
- Select the magic wand tool and click inside the shape.
- Create a new layer ('inner shield'), go to Select > Modify and contract the selection by 10px.
Fill this with #abb3be.
This is what it should look like by now:
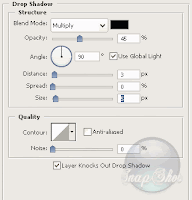
-With the inner shield still selected, go to Layer > Layer Style and change the following values:
Apply the same style on the base shield as well!
- Select the Gradient tool (foreground color: white, Foreground to Transparent, Reflected gradient, Opacity: 40% )
- Next, draw a straight horizontal line from the center of the 'inner shield' to the edge of the selection (left or right).
- Create a new layer ('top shine') and draw out an ellipse as shown below:
- Next select the base shield layer in your layer window, select the magic wand tool and while holding down Alt, click on the white background inside the ellipse
- Selext the 'top shine' layer again and fill the selection with white (opacity 30% )
- Create a new layer ('bottom light') and draw out an ellipse as shown below
- Select the 'inner shield' layer
- With the magic wand click (while holding down Alt) on the dark blue color of the 'base shield ' layer
- Next select your Brush tool with a Soft Mechanical brush of 200px and white as foreground color
- Select your 'bottom light' layer again and click halfway up inside the selection with your brush
- This should leave you with the folowing result:
- Press Ctrl+D, go to Filter > Blur > and apply a Gaussian blur of 20px
- Select the Custom Shape tool and pick the Boom1 shape
- Draw out this shape on your layer with a Fixed Size of 250x250px with #6b727e as the foreground color
- Right-click on the Shape layer in the layer window and Select 'Rasterize Layer'
- Go to Layer > Layer Style annd change the folowinbg values:
- Move the layer down right above the 'base shield' layer and you're done!
After resizing it to a smaller size, this is the final result:
Posted by
THC
at
5:13 AM
28
comments
![]()
Labels: photoshop
Saturday, April 07, 2007
BlogSomeDudette for Blogger2
A version for the ladies and girly girls...
View the Demo page to download the template.
A version for the dudes can be found here.
Posted by
THC
at
5:47 AM
0
comments
![]()
Labels: templates
BlogSomeDude Template for Blogger 2
Finally a new theme for Blogger 2
It isn't build from scratch but an edited version of the Scribe template.
View the Demo page to download the template.
Posted by
THC
at
5:16 AM
0
comments
![]()
Labels: templates
Friday, April 06, 2007
Transform a photo to an aquarelle painting
- Open your picture you wish to edit and duplicate it by right-clicking on it in the layers window
I'm using the following picture as an example:
- go to Filter > Artistic > Dry Brush and change the following settings:
This is the result you should get
- Next, Press Ctrl+L to set the levels
- Change the levels settings as shown below:
- Go to Filter > Texture > Texturizer and change the following settings:
Depending on the picture it could be that you need to tweak a few of the settings I just showed you, but if everything went well you should end up with something like this:
Posted by
THC
at
1:32 PM
0
comments
![]()
Labels: photoshop
Create a Mail icon or Logo in PS CS2
- Open a new file of 512x512px
- select the rectangular marquee tool and draw out a rectangle with a fixed size of 450px wide and 350 px high
- Fill it with #f1f2fa
- Go to Edit > Transform > Warp and apply a 'Rise warp' with a bend of 5%
This is what you should have:
- Copy the selection to a new layer and name the layer 'envelope'
- Go to Layer > Layer Style and change the following settings for 'Gradient Overlay'
The color used for the blue is #d5d6df
Also change the settings for 'Drop Shadow' to the following:
- And finally, add a 1px stroke (outside) with #d7d3d3 as the color for the stroke
- Create a new layer and draw out a cicrcle with the elliptical marquee tool as shown in the screensot bellow:
- Select your magic wand tool, select the 'envelope' layer and while holding down alt click iside the elliptical selection BUT make sure you click on the white background of the layer
This should give you the following:
- Select the top layer again and fill the selection with white (with an opacity of 25%)
- Next create a new layer (name it 'logo') and select your custom shape tool. Also change your foreground color to #524e4e
In the list of Custom default shapes you'll see a paw. Select this one, and draw out the shape as shown below:
- Go to Edit > Transform Path and Rotate the shape about 45° to the left
- Rasterize the vector mask by right-clicking on it in your layers window and selecting 'rasterize vector mask'
- Go to Layer > Layer Style and apply a Drop Shadow with the following settings:
- Select your 'Type Tool' and 'ChopinScript' as font with a size of 140 points and #8f1717 as the color
- Type in "Mail"
- Rasterize the layer by right-clicking on it and checking 'Rasterize Layer'
- Now go to Edit > Transform > Warp and select a 'Rise' warp with a bend of 15%
After possitioning the text in the left-bottom corner of the envelope, you should have somethinh like this:
- Go to Layer > Layer Style and apply a Gradient Overlay with the following settings:
Colors used are #8f1717 for the darker red and #945050 for the lighter red
Delete the background layer and resize your mail logo to the desired size and save it as a PNG file.
All done!
Result:
Posted by
THC
at
11:34 AM
0
comments
![]()
Labels: photoshop


