


- Open a new file of 500x500 and fill it with #57616f
- Create a new layer (name it big circle) and draw a circle of 300 by 300 pixels with the elliptical marquee tool and fill it with #96a4b7
- Create a new layer (name it small circle) and draw another circle, but this time 150 by 150 pixels in size and fill it with #cfd9e7
Position the two circles as shown in the screenshot:![]()
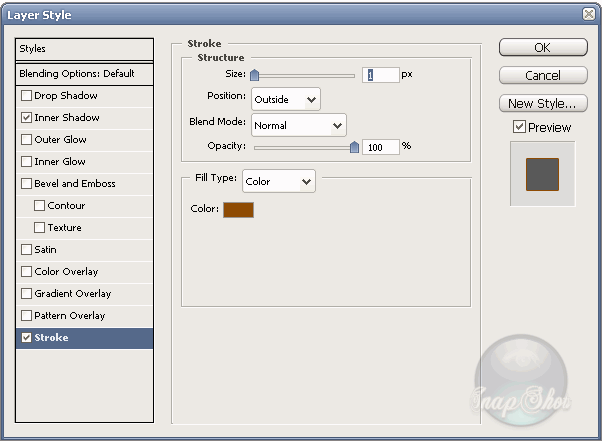
- Select the 'big circle' layer and go to Layer > Layer Styles and change the following settings:![]()
![]()
- Right click on the 'big circle' layer and select 'copy layer style'
- Now, select and right click on the 'small circle' layer and select 'Paste layer style'
All that the small circle still needs is a stroke, so go back to Layer > Layer Style and add an outside stroke of 1px with #57616f as the color.
You should end up with this:![]()
- Create a new layer (name it waves) and select the Rectangular Marquee Tool
- Draw a rectangle with a Fixed Size of 280px wide and 15px high. Fill this selection with white
- Duplicate this layer 2 times and position the bars as shown below:![]()
- Merge these 3 wave layers by selecting them while holding down Ctrl and right-click > Merge Layers in the layer window
- Go to Edit > Transform > Warp and apply a 'Flag' warp with a bend of 25%
- Select your 'small circle' layer again and copy the Layer Style like you did earlier and apply it to the 'waves' layer
- Possition the 'waves' layer as shown below:![]()
Now for the text part...
- select your text tool and pick 'Monotype Corsiva' as the font (you're free to use what font you want but I feel that this one suits best)
Use these settings for the font:![]()
- Rasterize the layer by right-clicking on it and paste the 'small circle' layer style on it
- Now possition the layer as shown in the screenshot:![]()
Almost there!
- Select the 'big circle' layer and create a circle of 240px by 240px with the Elliptical Marquee Tool
- Possition it as shown below:![]()
- Press Delete and your done
Final result:
Saturday, March 31, 2007
Create an Aqua Logo
Creating a hockey mask
- Open up a new file of 800x600
- Create a new layer and name it 'mask base'
- Select the 'Elliptical Marquee Tool' and draw out an oval shape as shown in the screenshot below:
- Fill it with #f5f5f5
- Turn on your grid (View > Show > Grid)
- Go to 'Edit' > Transform' > 'Warp' and apply a custom warp as shown below:
The red dots indicate where the points were before applying the warp
- Hide the grid and you should end up with the following:
- Create a new layer, name it 'mask shade' and make sure the ellipse is selected
- Set your foreground color to white
- Select your 'Gradient Tool' with a 'Reflected Gradient' and check 'Reverse'
- Now drag the gradient line from the center of the selection to either the right side or the left side of the selection
- This is what you should get:
- Go to 'Filter' > 'Blur' and give the Gradient a Gaussian Blur of 1 pixel
- Select the 'mask base' layer again and go to 'Layer' > 'Layer Style'
- Change the following settings:
- Create a new layer, name it 'upper light'
- Select the 'Elliptical Marquee Tool' and draw a circle as shown in the screenshot below:
- Select your 'Paint Bucket Tool' and fill the selection with white (opacity 80%)
- Create a new layer and name it 'mask line'
- Select the 'Rectangular Marquee tool' and draw out a rectangle as shown below (fill it with #c14646)
- Select the 'mask base'layer and then select the 'Magic Wand Tool'
- While holding down 'Alt', click with the Magic Wand inside the selection.
This will select the parts of the line outside the 'mask base' layer
- Select your 'mask line' layer again in the layer window and hit 'Delete' on your keyboard.
- Now move the 'mask line' layer down under the 'mask shade' layer.
This will leave you with the following result:
Select your 'mask base' layer and draw out an ellipse with a fixed size of 130px wide by 80px high, as shown in the screenshot:
- Press 'Delete'
- Do the same on the other half of the mask.
Congratulations!...you just created the eyeholes.
- Next, change the fixed size of the 'Elliptical Marquee Tool' to 30px wide by 30px high
-Place this as shown below:
- Press 'Delete'
- Create a new 30x30px circle next to the one you just did and hit delete again
- Repeat this process untill you end up with something like this:
All that is left now is to delete the background layer and merge the other layers
Create a simple speakerbox
If the images don't show up, just refresh the page or click the thumbs. They're there =]
-Open up a new file of 512x512px
- Select the 'Rectangular Marquee' tool and draw out a rectangle with a Fixed Size of
300px wide by 400px high and fill it with #e3e0e0
- Duplicate the layer and select the 'Gradient Tool' with a 'White to Transparant' gradient.
- Draw out aline from the bottom of the selection to the center of the rectangle.
Do the same from the top of the selection but this time just draw a line to about a third of the selection.
- With the marquee tool selected, right-click in the selection and click 'Layer via Copy'
- Next go to 'Layer' > 'Layer Style' and add an outside stroke of 2px with #b5b3b3 as the color
- Create a new layer and name it 'bottom circle'
- Select the 'Elliptical Marquee' tool and draw out a circle with a fixed size of 200px by 200px
- Possition it as shown in the screenshot below:
Fill it with black
- Go to 'Layer' > 'Layer Style' and change the following settings:
- Also add an outside stroke of 3px with #c0bebf as the color for the stroke
By now, your speaker should look something like this:
- create a new layer and name it 'top circle'
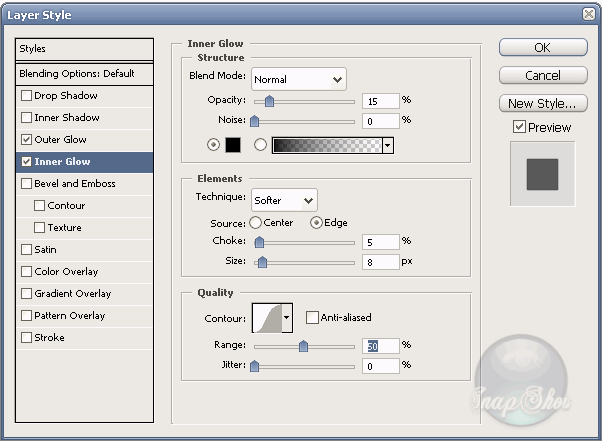
- Select the 'Elliptical Marquee' tool again and draw out a circle with a fixed size of 100px by 100px
- Go to 'Layer' > 'Layer Style' and apply the same settings as you did for the 'bottom circle' layer. But change the Inner Glow settings as shown below:
- Create a new layer and name it 'bottom inner circle'
- Select the 'Elliptical Marquee' tool again and draw out a circle with a fixed size of 50px by 50px and center it in the 'bottom circle' layer
Fill it with #e6e6e6
Go to 'Layer' > 'Layer Style' and change the following settings:

Also add an outside stroke of 1px with #616061 as the color
Your speaker should look like this by now:
- Duplicate the layer by right-clicking on it and drag it to the center of the 'top circle' layer
- With this layer selected go to 'Edit' > 'Transform' ad select 'Scale'.
Scale it down to 50% of the original size
- Delete your background and background copy layer and merge the remaining layers
- Go to 'Edit' > 'Transform' > 'Warp' and select a 'Bulge' of 25%
You're done and should have this as the final result:
Saturday, March 17, 2007
Dofus icon

Friday, March 16, 2007
Make a glass egg using the warp tool
This tutorial is only useful if you have Photoshop CS2!
If the images don't show up, just refresh the page or click the thumbs. They're there =]
- Open up a new file of 400x400 pixels
- Create a new layer and name it 'egg base'
- Select the 'Elliptical Marquee Tool' and create an oval as shown in the screenshot below:
'shot1'
- Fill this selection with #94fa11
Go to 'View' > 'Show' and check 'grid'.
This will be usefull when we start to warp the selection.
- Next, go to 'Edit' > Transform' > 'Warp' and create a 'Shell Lower' warp with a bend of 8% (this could vary depending on the ellips you drawed)
- Press 'Enter' to apply the warp.
You should have somehing like this now:
- Select the 'Gradient Tool' and pick a 'Foreground to Background' gradient with #94fa11 as the darkest color and #cefb94 as the lightest.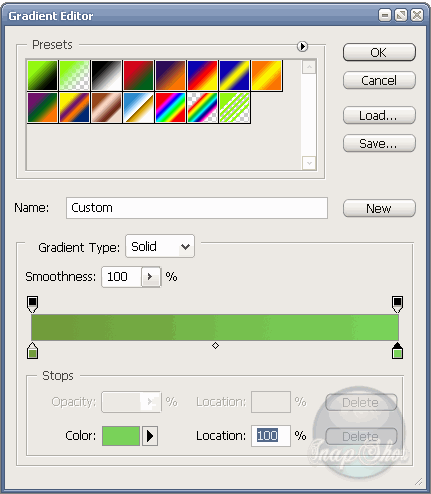
- Now, with the 'Liniar gradient' selected, draw a line from the bottom off the sellection to the top of the selection.
This should leave you with the following: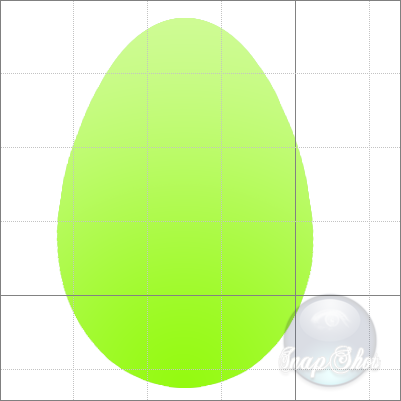
- Press 'Ctrl+D' and create a new layer. Name it 'gloss bottom'.
- Select the 'Elliptical Marquee Tool' again and draw a circle with a 'fixed ratio' and position it as shown in the screenshot:
- Select the 'Gradient tool' again and pick the 'Foreground to Transparant' gradient with a white color.
- With the 'Radial Gradient' selected draw a line from the bottom of the selected circle to the top the selection.
- Go to 'Edit' > 'Transform' > 'Warp' and create a custom warp as shown in the screenshot: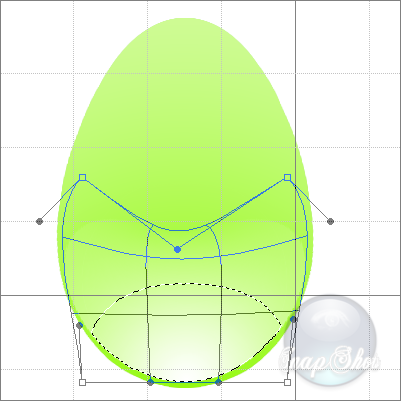
- You can always reposition the layer by selecting the 'Move Tool' and using the arrow keys on your keyboard.
By now you should have a similar result as the following:
- Create a new layer and name it 'gloss top'
- Select the 'Elliptical Marquee Tool' again and draw a circle with a 'fixed ratio' and position it as shown in the screenshot: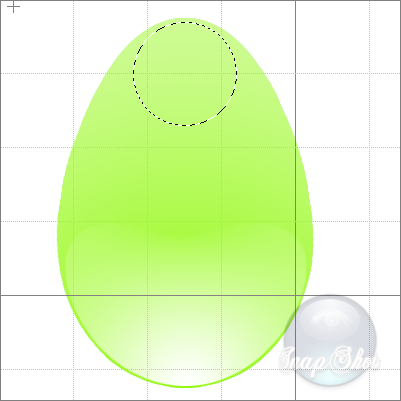
- Pick the 'Gradient Tool' again ('Foreground to Transparant' with a white color and 'Linear Gradient') and draw a line from the top of the selected circle to the bottom of the selected circle.
- Go to 'Edit' > 'Transform' > 'Warp' and create a custom warp as shown below:
- Press 'Ctrl+D' and remove the grid by going to 'View' > 'Show' and unchecking 'Grid'
- Now go back to the egg base layer and go to 'Layer' > 'Layer Style'.
Change the following settings:
Click 'OK' and you're done!
The final result: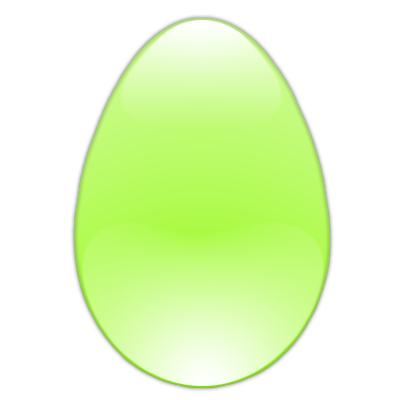
Create your own glossy Software Logo
In this tutorial I will show you how to create your own software logo.
I chose a logo for an Antivirus, but obviously this tutorial works for other applications as well.
Note: Don't mind the quality of the screenshots. The result looks perfectly smooth in Photoshop.
- Open up a new document of 256x256
- Select the 'Elliptical Marquee Tool' and while holding down 'Shift' draw out a circle and as shown below
- Fill it with #fcb303
- Right-click on the selected circle you just made and select 'Layer via Copy'
Now go to 'Layer' > 'Layer Style' and change the following settings:
The colour used for the stroke is #8e4b03
- Next, select your Circle with the 'Magic Wand', go to 'Select' > 'Modify' > 'Contract' and give in a value of 5px.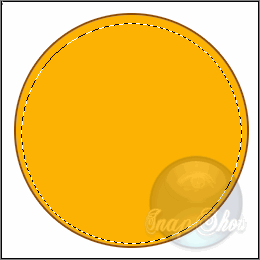
- Select your 'Gradient tool' and choose a 'Radial Gradient' going from white to transparant and draw a line from the bottom of the selection halfway up the contracted circle.
- Then press 'Ctrl+D'
This should give you the following result:
- Create a new layer and name it 'glass_top'
- Select your 'Elliptical Marquee Tool' again and draw out a circle as shown below: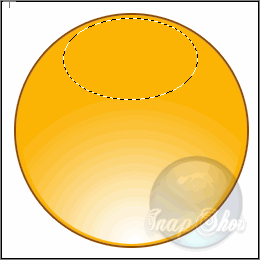
- Select the 'Gradient Tool' again with a liniar gradient going from white to transparant, and draw a line from the top of the selection to the bottom of the selection.
- Press 'Ctrl+D'
This should leave you with the following result: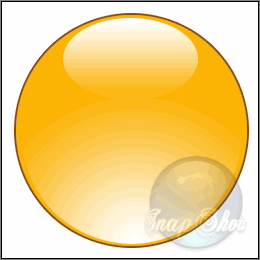
There you go. You just finished the base of your logo.
Next up is the logo itself.
Since this is a tutorial on how to create an antivirus logo, I'm picking a shape that clearly fits the subject.
From here on out you're free to choose whatever shape you want ofcourse.
- Create a new layer (name it 'logo') and select the 'Custom Shape Tool'
- One of the default shapes is a target symbol. 
This is the one I'll be using for this tutorial.
- Select the shape and while holding down 'Ctrl' draw out the logo so that it's evenly sized in width and height.
- Right-click on the layer thumbnail and select 'Rasterize Vector Mask' so you'll be able to move it around and position it in the sphere.
(Select the 'Move Tool' to move the layer around)
- With this layer still selected, go to 'Layer' > 'Layer Style' and change the following settings: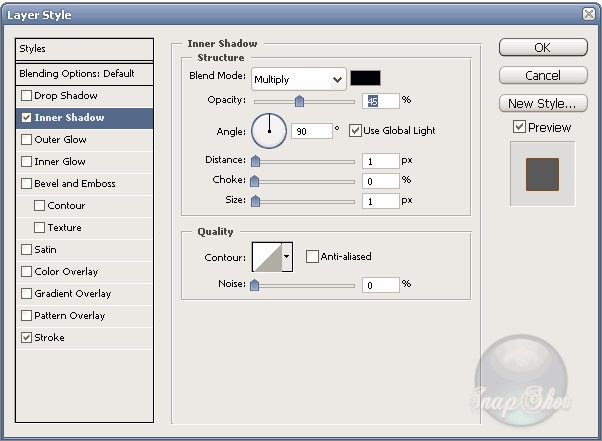
The colour used for the stroke is #8e4b03
All that is left now is to move the layer down so that it's under the 'glass_top' layer and delete the background layer.
If everything went right you now have a nice looking Antivirus software logo.![]()
I hope you liked this one =]


