- Open up a new file of 800x600
- Create a new layer and name it 'mask base'
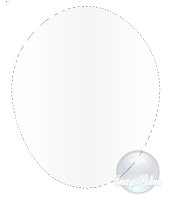
- Select the 'Elliptical Marquee Tool' and draw out an oval shape as shown in the screenshot below:
- Fill it with #f5f5f5
- Turn on your grid (View > Show > Grid)
- Go to 'Edit' > Transform' > 'Warp' and apply a custom warp as shown below:
The red dots indicate where the points were before applying the warp
- Hide the grid and you should end up with the following:
- Create a new layer, name it 'mask shade' and make sure the ellipse is selected
- Set your foreground color to white
- Select your 'Gradient Tool' with a 'Reflected Gradient' and check 'Reverse'
- Now drag the gradient line from the center of the selection to either the right side or the left side of the selection
- This is what you should get:
- Go to 'Filter' > 'Blur' and give the Gradient a Gaussian Blur of 1 pixel
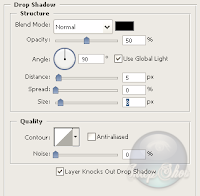
- Select the 'mask base' layer again and go to 'Layer' > 'Layer Style'
- Change the following settings:
- Create a new layer, name it 'upper light'
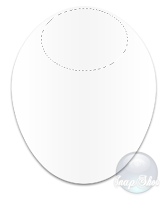
- Select the 'Elliptical Marquee Tool' and draw a circle as shown in the screenshot below:
- Select your 'Paint Bucket Tool' and fill the selection with white (opacity 80%)
- Create a new layer and name it 'mask line'
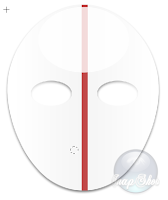
- Select the 'Rectangular Marquee tool' and draw out a rectangle as shown below (fill it with #c14646)
- Select the 'mask base'layer and then select the 'Magic Wand Tool'
- While holding down 'Alt', click with the Magic Wand inside the selection.
This will select the parts of the line outside the 'mask base' layer
- Select your 'mask line' layer again in the layer window and hit 'Delete' on your keyboard.
- Now move the 'mask line' layer down under the 'mask shade' layer.
This will leave you with the following result:
Select your 'mask base' layer and draw out an ellipse with a fixed size of 130px wide by 80px high, as shown in the screenshot:
- Press 'Delete'
- Do the same on the other half of the mask.
Congratulations!...you just created the eyeholes.
- Next, change the fixed size of the 'Elliptical Marquee Tool' to 30px wide by 30px high
-Place this as shown below:
- Press 'Delete'
- Create a new 30x30px circle next to the one you just did and hit delete again
- Repeat this process untill you end up with something like this:
All that is left now is to delete the background layer and merge the other layers
Saturday, March 31, 2007
Creating a hockey mask
Subscribe to:
Post Comments (Atom)


No comments:
Post a Comment