- Open a new file of 512x512px
- select the rectangular marquee tool and draw out a rectangle with a fixed size of 450px wide and 350 px high
- Fill it with #f1f2fa
- Go to Edit > Transform > Warp and apply a 'Rise warp' with a bend of 5%
This is what you should have:
- Copy the selection to a new layer and name the layer 'envelope'
- Go to Layer > Layer Style and change the following settings for 'Gradient Overlay'
The color used for the blue is #d5d6df
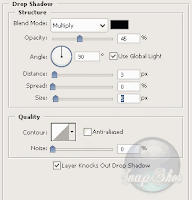
Also change the settings for 'Drop Shadow' to the following:
- And finally, add a 1px stroke (outside) with #d7d3d3 as the color for the stroke
- Create a new layer and draw out a cicrcle with the elliptical marquee tool as shown in the screensot bellow:
- Select your magic wand tool, select the 'envelope' layer and while holding down alt click iside the elliptical selection BUT make sure you click on the white background of the layer
This should give you the following:
- Select the top layer again and fill the selection with white (with an opacity of 25%)
- Next create a new layer (name it 'logo') and select your custom shape tool. Also change your foreground color to #524e4e
In the list of Custom default shapes you'll see a paw. Select this one, and draw out the shape as shown below:
- Go to Edit > Transform Path and Rotate the shape about 45° to the left
- Rasterize the vector mask by right-clicking on it in your layers window and selecting 'rasterize vector mask'
- Go to Layer > Layer Style and apply a Drop Shadow with the following settings:
- Select your 'Type Tool' and 'ChopinScript' as font with a size of 140 points and #8f1717 as the color
- Type in "Mail"
- Rasterize the layer by right-clicking on it and checking 'Rasterize Layer'
- Now go to Edit > Transform > Warp and select a 'Rise' warp with a bend of 15%
After possitioning the text in the left-bottom corner of the envelope, you should have somethinh like this:
- Go to Layer > Layer Style and apply a Gradient Overlay with the following settings:
Colors used are #8f1717 for the darker red and #945050 for the lighter red
Delete the background layer and resize your mail logo to the desired size and save it as a PNG file.
All done!
Result:
Friday, April 06, 2007
Create a Mail icon or Logo in PS CS2
Subscribe to:
Post Comments (Atom)


No comments:
Post a Comment